What Are Filters in Jira?
Efficient project management with Jira? Absolutely. The tool enables you to sift through vast amounts of data using filters, which are essentially saved queries that help find and organize issues based on specific criteria.
When creating filters in Jira, you can customize your work environment according to your project’s unique needs. Whether you’re tracking Epics, Stories, Tasks, or custom issue types, filters empower you to zero in on the information crucial to your workflow.
Understanding how to create filters in Jira is essential to unlocking the true potential of this powerful tool. Join us on this journey as we explore the concept of filters and provide a comprehensive guide for 2024. Let’s dive in and optimize your project management workflow with precision and ease.
Popular Jira Filter Use Cases
Jira filters serve as valuable tools in project management, offering solutions across various scenarios. Here are some popular use cases for Jira filters:
- Issues Assigned to Me: Filter issues assigned to the current user to track personal tasks and workload.
- My Team’s Open Issues: Filter open issues assigned to members of a specific team or group for team-level planning.
- Bugs to Fix: Filter bug issues with a certain priority or affecting a specific version to focus on critical defects.
- Unresolved Issues: Filter unresolved issues to identify what still needs work or is blocked.
- Epics and Stories: Filter for epics or user stories to get a high-level view of project progress.
- Issues Due Soon: Filter issues with a due date in the near future to make sure impending deadlines are met.
- Recently Updated: Filter recently updated issues to stay on top of the latest activity and changes.
- By Component or Version: Filter by component or fix version to analyze work on specific project areas.
- Quality Assurance: Filter issues assigned to QA team members or with a Ready for Testing status.
- Reports and Metrics: Create custom period-based filters for reports on sprint progress, velocity, cycle time, etc.
These are just some examples – filters allow endless combinations for slicing and dicing issues based on your team’s workflow and the insights you need. Saved filters facilitate reporting, planning, and driving your projects forward efficiently.
Difference Between Jira Basic Search and Advanced Search Modes
Jira offers two search modes: Basic and Advanced. Basic search is the default mode allowing keyword-based searches across fields like summary and description. It’s great for quick queries but limited in the complexity of Jira filter syntax.
Advanced search, on the other hand, utilizes Jira Query Language (JQL) to construct precise Jira custom filters with multiple criteria such as project, assignee, dates, custom fields, and more. JQL knowledge is essential to create and save complex Jira filters. Advanced search is powerful for building reusable queries that can be shared, subscribed to, and used in workflows.


How to Create Filters in Jira
Creating filters in Jira enhances your ability to manage and navigate through project data effectively. Follow these steps to master the art of filter creation:
- Navigate to Issues
Start by selecting the Issues option from the Jira menu. This takes you to the Search Issues page, where you initiate the filter creation process.
- Refine Your Search
Use either the Basic or Advanced search to define your criteria. Specify parameters such as issue types, statuses, and assignees to tailor your search.
- Save Your Jira Filter
After refining your search, save it as a filter by clicking Save Filter. Give your filter a meaningful name and description for easy reference.
- Access Your Saved Filters
Head to Issues > View All Filters to access and manage your saved filters. This is the control center for modifying or deleting filters.
- Share Your Filters
Collaboration is key. Share your filters with team members by setting Viewers and Editors in the filter details.
- Subscribe to Filters
Stay updated by subscribing to your filters. Receive notifications for changes or new issues matching your filter criteria.
Now you know how to add a quick filter in Jira. By mastering these steps, you’ll optimize your Jira experience, ensuring a tailored and efficient approach to project management.
Boost your teams’ efficiency
Maximize your team’s productivity by easily duplicating your epics, tasks and stories with “Easy Issue Templates for Jira Issues”
Managing Jira Filters
Managing Jira filters is crucial for maintaining an organized and streamlined project environment. Navigate to Issues > Administration ⚙️ > System > Shared Items > Filters. to access a centralized hub for your all existing filters, both private and shared.

Here, you can view and set up filters:
- Search/Owner: Search for filters based on the name, description, or the owner who created them.
- Name: Select the filter name to open it and make the necessary edits.
- Shared with: Check if the filter is public, shared with specific groups, or limited to individual users.
- Popularity: Discover how many users selected this filter as their favorite.
- Actions: Click on ⋯ if you want to change the owner or delete the filter.
By utilizing these features, you can efficiently manage your Jira filters, ensuring they remain relevant, up-to-date, and accessible to the right people. Regular maintenance of your filter library is essential for optimizing project visibility, collaboration, and overall team productivity.
Sharing Jira Filters
Sharing Jira filters with your team is a simple process that can greatly enhance collaboration. To share a filter, navigate to your list of saved filters in the Filters section, select the one you wish to share, and click on ⋯ > Edit. Here you can customize the filter sharing by selecting Viewers and Editors. Project, Group, My Organization, User, and Private options are available to tailor access permissions.
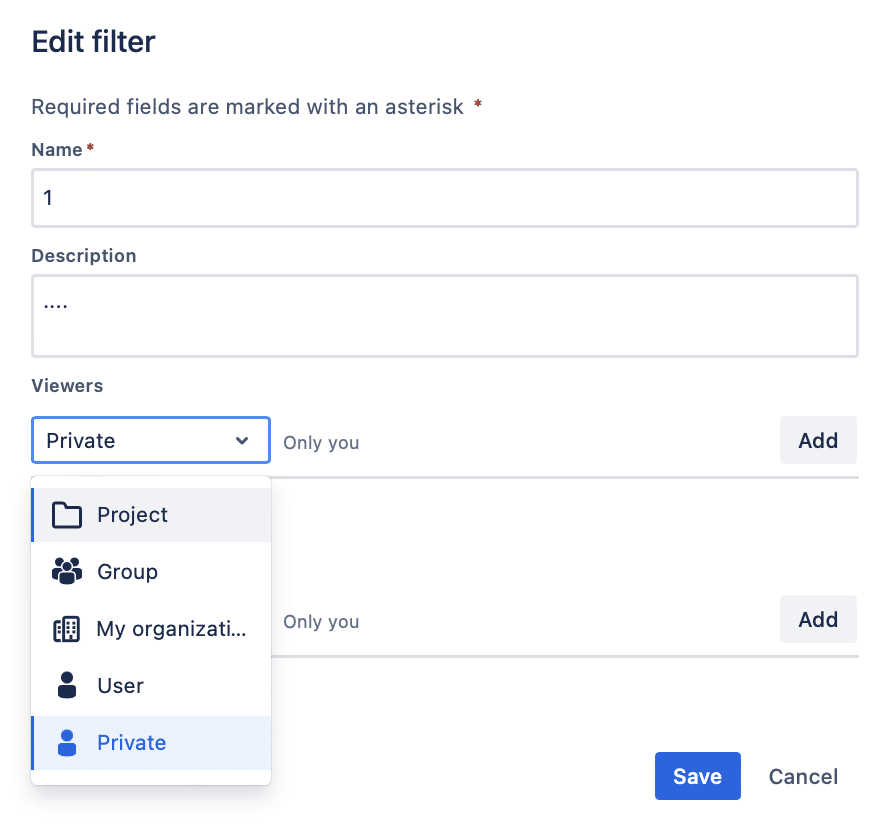
Once shared, team members can easily find and apply the filter, ensuring everyone is working with the same dataset and priorities.
Subscribing to Jira Filters
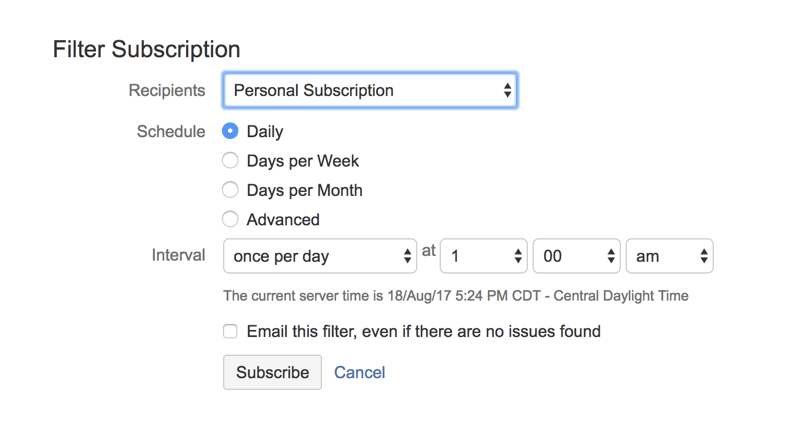
Subscribing to Jira filters allows you to stay informed about any changes or updates to the filter. To subscribe to the filter you wish to follow, select Details (next to the filter name) > New subscriptions. Complete the information and select Subscribe. This action will ensure that you receive notifications when the filter criteria or list of issues changes.
Notifications can be delivered via email or within the Jira platform itself. Subscribing is especially useful for filters related to your work, such as issues assigned to you or your team, bugs requiring attention, or project milestones.
Summary
Whether it’s tracking personal tasks, monitoring team progress, prioritizing bug fixes, or generating detailed reports, well-crafted Jira filters are your key to success. By following this comprehensive guide, you’ll know how to create filters in Jira to uncover essential insights for optimal decision-making and workflow efficiency.
With well-designed filters at your fingertips, you’ll be unstoppable in driving successful delivery and continuous improvement. Filter away!

